I have discovered a secret.
I know what shoots out of Spiderman’s wrists to help him swing from building to building. It is not silky web stuff, as previously thought.
It is marshmallow!!

If you are not a fan of the shop bought marshmallow then making your own will convert you – they are so much silkier, and don’t have any of the nasty preservatives etc. But boy is the mixture sticky, and stringy. Sticky, sticky, stringy goop, there is no other way of describing it. It is fun to wrestle with though!

And once you have wrestled as much of it out of the mixing bowl as possible you must, must pour boiling water into it, otherwise you will be chiselling it off for days. Or you may relent and just buy a new mixer bowl.
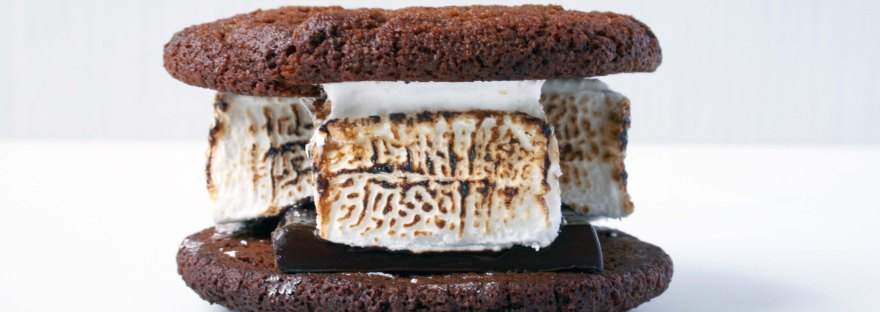
At this time of year there are a lot of s’more recipes floating around and in previous years they have tormented me. I can remember being at Brownies when I was younger and making s’mores – toasting the marshmallow on a candle before sandwiching it between two digestive biscuits or sometimes two rich tea biscuits, squishing the biscuits down so that the gooey melted marshmallow squidged delightfully! I don’t recall there being any chocolate involved though, but it is a very welcome addition.

I have often thought that these biscuits would make a good base for a s’more, but up until now I have resisted. This year I relented and used ginger nuts as the biscuit and made my own marshmallows – so, so good.

The spice in the biscuit complements the sweetness of the marshmallow, the chocolate softens slightly but still retains a good snap. Although . . . I used a culinary blow torch to toast my marshmallow and whilst it did melt them a little, it was no where near as gooey as it could have been. I would suggest skewering them on a wooden skewer and holding them over a gas hob (or a candle, or a bonfire) to get them nice and toasty on the outside and soft and squidgy in the middle. Just be careful not to set fire to them!
The added benefit to toasting them this way would mean that the chocolate would melt a little more, which I think would be all the more pleasing.

Whatever way you decide to torch toast your marshmallow, you won’t be disappointed. Just eat them over a plate . . .

Homemade Vanilla Marshmallows
Ingredients:
- 10g powdered gelatine
- 32ml cold water
- 200g granulated sugar
- 60ml liquid glucose, or corn syrup
- 60ml hot water
- 1 tsp vanilla bean paste
- cornflour for dusting
Method:
- Line a 8 inch x 8 inch baking tin with foil. Dust the bottom with a good layer of cornflour, making sure there are no gaps, it needs to be completely covered. If possible try and scoot a bit up the sides too.
- Place the gelatine in a bowl of a stand mixer and cover with the cold water, making sure it is all saturated. Leave to stand while you prepare the rest of the mixture.
- Attach the whisk attachment to the mixer and lower it so you are all ready to go when the hot sugar mixture is ready to be added.
- Put the sugar, liquid glucose (or corn syrup) and hot water into a heavy bottomed medium saucepan. Heat gently until the everything has dissolved. Clip on a sugar thermometer and raise the heat to medium-high. Let it bubble until it reaches 121 Celsius / 250 Fahrenheit.
- Once the sugar mixture has reached temperature take it over to the stand mixer. With the whisk on a low speed gently pour the hot sugar mixture down the side of the bowl – this will prevent splashing and the gelatine being sorched.
- Raise the speed to high and beat until it starts to stiffen and double in volume. Turn off briefly to add the vanilla bean paste and then return to high speed (note – do not try to add the vanilla bean paste with the mixer running, it will be whipped away and splattered up the side of the bowl without making it into the marshmallow mixture. I speak from experience!)
- Beat until light, white and fluffy.
- Grease a silicone spatula with a flavourless oil (an oil spray will work best). Scrape the sticky marshmallow mixture into the prepared tin. You will need to work quickly as the mixture will start to seize up rapidly and then it is all the more difficult to handle!
- Leave to set for at least 4 hours.
- Remove the foil from the baking tin and set onto a chopping board. If your marshmallow is thiner than you would like then gently ease the edges away from the foil and slide a palate knife underneath and carefully fold it over – sticky side to sticky side so that you double the thickness. Using a sharp knife, cut the marshmallow into pieces. Toss each piece in cornflour, making sure the cut sides are coated otherwise they will stick to each other.
- Store in an air-tight container away from direct sunlight. They should keep for a couple of weeks at least.
S’more Assembly:
- Take two ginger nut biscuits (or if you don’t fancy ginger biscuits then I would suggest the following: flax-meal biscuits, lemon flax-meal biscuits or go the whole hog and use chocolate chip cookies).
- Place a square of chocolate on one (I like 70% dark chocolate).
- Toast your marshmallow(s) using a culinary blow torch or a gas ring (or a bonfire).
- Place the marshmallow on top of the chocolate and top with the other biscuit. Give it a little squeeze before devouring immediately!
© The Pink Rose Bakery 2015

First off, you have a lovely website and we share something in common, the SELA theme. These Ginger S’mores sound absolutely delightful. Now that I’ve stopped drooling, could I ask how you created your lovely P and your blogroll? Although WordPress offers tutorials from soup to nuts, I’m always discovering new ideas. Thanks.
LikeLike
Hi! Thank you for your lovely comments.
The blog roll was created using the custom menu widget. I created a new menu and then used to widget to allocate that to my sidebar. The ‘P’ I made myself using a clipping mask in Photoshop. Hope this helps, let me know if I can help any further, I’m always happy to 🙂
LikeLike
Do you have any idea where s’mores get their name…? I’ve often wondered. These look extremely gooey and alluring, and must therefore be terribly bad for you, especially with added choccy. Fortunately, I’m not a huge marshmallow fan, so my sugar intake can stay at a manageable level this week!
LikeLike
I believe – and I may be wrong on this one but – they are called s’mores because they are so yummy you want some more, aka s’mores . . .
LikeLike
Makes perfect sense!
LikeLike